Saturday, April 10, 2010

1:12 rustic breads

slightly overexposed, but i likes it!

i'm currently working on some prototypes, as stated in an earlier post (the unpainted breads). finally got round to painting them now that they're fully dried. i used acrylic paints, mixed up the colours as i went along since i don't really know what colours to use. i like this range, but when i showed them to my brother, he said they're too light. gee and i thought they were pretty dark already!

anyway. took the opportunity to take some more shots since there was beautiful light this afternoon after the rain. i welcome all and any constructive criticism, i'm really fearful of painting, so part of why this took so long was the procrastinating of picking up the brush!!! XD

more pics.

that's a lot of carbs. well, not really, but i do so miss eating breads T_T


baguettes and stuff? i painted them 3 different hues, but i guess due to the light everything looks...lighter. sheesh.

i like the ones at the bottom left.


these were the ones i kinda majorly messed up after i tried baking them to speed up the drying process. haw haw haw. ANYWAY.

and the longest bread here, part of the lighter coloured range which is sorta what we see more frequently around singapore. it's a local adaptation of the french loaf, affectionately known in hokkien as "Jiam Tao Loti" (pointy head bread), but i grew up calling it 'roti pranchis' which i do not know what it translates into. funniest version i've heard was "neh neh pok" bread which is a ....children's term for "breasts" XD

i think this pic is a little too 'cold' (too much blue) and will probably have to edit it but i like it still for ....what it is. whatever it is. heh :-/

my fave shot of all. this was the most fun photoshoot i've had in a while, probably because i liked the light today (thank you Sun!) and cos i've finally gotten a whole BATCH of stuff completed instead of my usual itty bitty one-off pieces. LOOK SANS!!! I TRIED TO MAKE A SCENE!!! XD

Friday, April 9, 2010

1:4 choc chip cookies, chocolates, and some loot!


1:4 scale choc chip cookies. commissioned items.


1:4 scale chocolates. part of the same commish.


same breads but taken in better lighting. i haven't yet painted the other batch. real life keeps butting in, i'll try and complete them tomorrow. having a bit of problems figuring out what colours to use though. the breads in Singapore (the ones most commonly seen) tend to be more ochre-ish than brown. wonder why. i think it might have something to do with it looking prettier? or just coincidental due to type of flour used?


re-printed the striped liners, and made them in various shades.

and then, i practiced tying little bows out of teeny ribbons! width of this ribbon is 3mm wide. the bow itself is barely 1cm wide.


===============
boring personal entry below, you can skip it XD


ran to a few places today after a nice afternoon out with my aunt. we went to a food fair, but there wasn't really much special there, so we wound up having lunch at a japanese restaurant.

headed over to Funan (an IT mall in SG) but couldn't find what i wanted, and got trapped in a stationary store. XD i really love stickers, have loved them since i was a kid. the papers are for....what else, cupcake liners. they're thinner than what i'm currently using, so i don't know if my customers would be able to handle the flimsiness, but oh~~~ 50 COLOURS!!!! XD

and lots of ribbons too. approx 1.5-3mm wide...i taught myself how to tie bows, with minimal wastage! i guess if you wanna learn how to you've gotta check out some youtube vids or summat, it's kinda complicated and you need like, 4 arms. OK I JEST but yea it's really fiddly working at such small scales.

and the microbeads are FINALLY HERE OMG T_T i waited SOOOOO long for these! finally i can make the cookies i've been holding back on!!!!!!!!!!!!!!!!!!!!!!!!!!!!!!

k. got stuff to do. and it's late. and i'm exhausted.

nitenite :D

Thursday, April 8, 2010

1:12 rustic bread prototypes, crappy pics warning


a repeat customer of mine requested some polka dotted and striped cupcake cases. i have a pretty old dinosaur of a printer, so this was the best i could do.


compare and contrast (again ha ha). this is my first attempt, and the edges were jagged. i use GIMP, a free photo-manipulation software (no way can i afford photoshop) and as with photo-taking, i'm kinda crappy at manipulating images. i think the latter attempts are pretty decent, just have to figure out a way to improve on the resolution (i used best quality photoprinting, but i guess i still need to get the correct papers :( )


my youngest bro is so funny. he got these 2 keychains from a gachapon machine. you know those coin eaters that guzzle up your spare change in return for unbearably cute and useless items? yea i'm a HUUUUGE fan! XD well, he was out with his pals and all of them got various animals from the zookeeper series gachapon machine. so Ray wanted one too! but out of the 10 possible keychains, only 2 were humans, and after he failed on the first try to get an animal, he tried again, only to get the other human XD anyway he asked if i wanted them since they're minis, of COURSE i do XD

ha ha at this angle, that moustached man really does look hungry. i made some prototypes of various breads, but as you can see, the colour balance is more than a little off. it appears TOO yellow in these photos. they -are- a little more yellow than i'd like, but really, not as bad as pictured grr. really have to make another attempt at phototaking tomorrow. and yes, that's Petitplat aka Stephanie's plate again HA HA! i really should use some of the other plates. XD


here's what i made this morning. i wanted to test out various shapes and intended to colour these with 3 different mediums, but in my rush to get them to dry, i stupidly popped them in the oven and they expanded and mis-shapened XD serves me right! ha ha! well i managed to squish them back into shape a little more, will do the colouring tomorrow when there's more light.

the cookies to the left of the breads aren't huge cookies in 1:12, they're 1:4 scaled. a commission that i got recently. i am rather pleased with them, so i'll take better pics of them tmrw lest they turn out all funky coloured AGAIN. and i'm planning a post on the different scales, and my observations on working at the different sizes. i've had feedback that it's confusing, but really, it's not! plenty of online resources on how to calculate it too ^ ^


yeah. i've been busy. busy is good! catch you folks around soon, sorry i'm not replying comments as frequently as i used to, but i do so appreciate them!

Tuesday, April 6, 2010

Tips on Caning

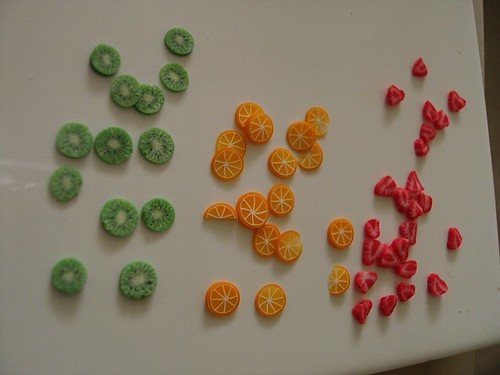
i haven't actually done all that much caning, as in, when i first started out, yes, i did make loads of canes. oranges, strawberries, lemons, kiwis. all of which when i remove from my container of shame, i cringe at how bad they were. but as in almost all of my clay endeavours, i seldom if ever succeed on my first try. compare and contrast:

the above canes were done before May 2009. orange canes were my first ever canes (not depicted here, you'd have to plough through my flickr account to see how horrific they were :P ). i followed Angie Scarr's really wonderful tutorials (look for the free tutorial links on her site) and as proud as i was of them back then, i knew there was room for improvement. the kiwi slices were kinda hodgepodged together, as with the strawberry slices, although i did take a few tips from Marjo Caris. along the way, i've seen truly realistic and awesome cane slices that deviated somewhat from the ones taught in popular online tutorials and books, so i figured, heck, i might as well start experimenting with my own versions of fruit canes rather than produce the more 'typical' sorts of canes. after all, i think i'd figured out the basic techniques.

the following tips are stuff i've come to slowly notice is truly important to -my- caning process. i stress this because i know there are plenty of tips available on the net, but due to individual brands of clays' properties, and the climate and conditions i live in (tropical, non-airconditioned room) i've had to struggle with finding the best clay suitable for my warm hands, and how to obtain the colours i want.


also, you might find that these tips are 'too much' as in, some aren't really necessary. but owing to my nature, i like things to have a certain consistency. and improving upon basic techniques helps reduce wastage :) well, if you are following a book/tutorial, they should pretty much have the basics laid out for you, but i don't follow any particular method nor do i own any books, so these help me in -any- sort of caning i do.

here are pointss i always try to remember:

- avoid air bubbles

while conditioning polymer clay, and assembling the cane, be careful not to introduce air bubbles. air trapped in the cane would result in holes in the cane, and distortions to the general shape. unless you -want- the bubbles, although i have no clue how you would control the reduction of the canes.

- keep to 1 brand of clay for each cane
since it's always warm here, i favour KATO polyclay. it's harder than any other brand of polymer clay i've tried. i use mainly translucent, and i've also got a pack of primary colours (red, blue, yellow concentrates) and green, since i'm terrible at mixing green. this tip is to ensure that during the caning process, the clay's hardness is evenly distributed throughout the cane. if you happen to have clays of different hardness/softness, the way the clay shifts throughout the clay will be uneven, winding up with distortion.

- test bake colours before starting on your cane
for the less experienced (i.e. me ha ha!) or those who mix up their own colours, i highly recommend testing a small pinch of clay for each colour component of your cane BEFORE you start assembling and reducing your cane. most of my earlier canes turned out chalky and almost cartoonish since i didn't know what ratio of translucent clay to use vs coloured clay. i flatten out a small ball of clay to the thickness i wish my slices to be, and bake to see how it would look. this helps reduce wastage of huge batches of clay.

- rest the clay before reduction/cutting (raw canes)
before reducing your assembled cane, try to let it rest for a while so that the temperature of the cane is evenly distributed. this is because the outermost layer would probably be softest as the clay has been in contact with your hands. if you are slicing your canes before baking (i do that for my citrus canes to give them a little more texture), make sure your canes are firm. i keep an icepack handy and plonk my canes on them before i slice. i usually only get a few slices out before i have to re-cool them, so i keep about 2-3 canes on the ice pack and rotate the canes during the slicing process.

some people recommend warming the cane up thoroughly with your hands before reduction, but i've found that makes the cane reduce too fast for my liking. who knows, it might work better for you :D


- use end caps
i recall some polymer clay caners use glass end caps for reduction. i didn't use to do that, i simply pinched and pinched and wound up with oddly shaped ends, hence more wasted clay. for my more recent canes, i used 2 tiny round ceramic tiles approx. 3/4" diameter on each end, and went at it. this method also ensures the clay is evenly distributed and drawn out along the length of the clay, as the end caps create a vacuum for the non-visible gaps between different colours of clay.


- pinch and pull, not roll
resist the urge to roll the cane. although that process helps smooth out the clay, it should really only be used after you've gotten the cane down to the size you want. rolling the clay results in uneven distribution and creates a 'swirly' effect, so unless you're making candy canes and the like, i really wouldn't recommend it.


- make sure you're baking the canes at the correct temperature
oh boy i learnt this the hard way. for the longest time i kept wondering why my canes were brittle. when i initially experimented with caning, i mixed up all sorts of brands of clay, depending on what colours i needed. bzzt. bad move. some clays require a higher baking temperature, and since i was always fearful of charring my clay, i'd baked at a lower temperature (for a longer duration). however, my canes were mostly brittle, and consistently chipped while slicing. well, i know better now :-/

- let the canes cool in the oven
some people prefer to slice their canes straight out of the oven as the hot clay is softer. i work with a fan blasting at me at all times since it's mostly warm here (23-28 deg celcius), and the canes often cooled too fast. this makes for a more brittle cane. i tested it out today on the kiwi canes, and there -is- a significant difference to the hardness/brittleness of canes that have been left to cool in the oven vs one that's sliced fresh from the oven.

--------------

ok that's all i can think of right now. i'll probably add more or adjust this at a later time. hope this was helpful to you :) if it isn't, too bad, it's helpful to me and my failing memory XD XD XD

Sunday, April 4, 2010

quest for the perfect fruit cane


was thinking of starting on some smaller scaled items, perhaps it's cos i've been making so many larger ones i am suffering from withdrawals XD

here are some 1:12 and 1:24 canes. the teeniest banana slices are approx 1-1.5mm wide.

the lemons were test slices to see the colours. i think i am quite happy with them, though the rinds might be a tad too translucent and the whites not prominent enough. but maybe it's the lighting.will try to take better pics...yea i know i'm always saying that but really, i hate taking photos. :X


all these are actually older canes, save for the lemons. i tried mixing up some greens for kiwi, but i fail miserably at greens. i think i need more practice. anyway, those i will attempt another day, meanwhile i have new requests coming in that seem very exciting, and i'm hoping they pan out so i can work on them.

FINALLY SOME 1:12 MINIS BWA HA HA!!! *jumping rabbit mode* ;)

my dodgy email acct

 (dodgy, not doggy)

ok, since last year, i've had quite a few 'lost' emails. they were delivered into my account alright, just that they were marked as "Read" and filed in random categories, so i never saw them in my inbox! i noticed it happened a few times, especially after first few correspondences, or when i have my gmail window open when the mail came in and it somehow mysteriously got marked read when i swear i didn't touch it. :(

i suspected that my mail filters had something to do with it, but i never figured it out till early this year, so i did a cleanup of the filters. however, mails between Aug 2009 till Jan 2010 might have been overlooked. i have over five thousand mails (bulk of which are subscriptions :( ) to go through, and will be doing a massive cleanup soon. i really really do apologize if you've mailed me and i hadn't replied, i wasn't ignoring you, just didn't know you'd written me! *mortified*

Wednesday, March 31, 2010

strawberry cakes & more macarons

strawberry cakes

strawberry cakes 2

strawberry cakes 3
sooo....

like some of you probably know i have been doing a few larger scaled commissions, and the bulk of it comes from Den of Angels (DoA), a ball-jointed doll forum. if you're a member and have at least 40 posts, you can view my marketplace and commission threads:


http://www.denofangels.com/forums/showthread.php?t=345069
http://www.denofangels.com/forums/showthread.php?t=350187

these are my latest commissions, in 1:4 scale.^ ^

macarons too

macarons side by side
the ever popular macarons. i honestly honestly HONESTLY considered never ever EVER making these again. not only are they kind of hellish to make in larger scales (i don't use molds), the mixing of the colours are TORTURE on my wrists/hands. but beggars can't be choosers, and i really do need the $. so i guess i'll have to suck it up and keep making these for as long as people want 'em. =3=

old vs new
the ones on top are for my customer. my first attempt at this commission is pictured below. ok, so why did i torture myself twice? or, 12 times? because after making the first batch, i realised that it was slightly blockish, and i wasn't quite satisfied with the colours. my customer requested the fillings to be lighter coloured, almost close to white, but can you see the fillings for the 4 lighter colours look...well, WHITE! GAH!

 i couldn't. i just couldn't let it go. i thought, heck. i'll sleep on it and let my customer decide if she likes it. BUT I COULDN'T LET IT GO. AUGH!!!!!!!!!!!! so i made another batch.  btw. each  batch took me almost 4 hrs to complete. no, i wasn't multi-tasking or anything, i just REALLY DO WORK THAT SLOWLY. i think cos i had to mix up the colours, condition the clay, and GET THE FRIGGING @#$)*@#&$*#& DUST out of the clay AUGH!!!!!!!!!!!!!!!!!!!!!!!!!!!!, shape, bake, cool, mix up filling colours, rebake, cool etc....

maybe i should turn the room into a clean room, like those in silicone wafer factories or summat XD might be better for my allergies too HA!


sprinkles
aaand, of course there will always be waste clay. this batch of sprinkles i made from the first 'failed' batch of macarons. haven't yet rolled out the rest of the oddly coloured clay. thought of making jellybeans, but i really should rest my hands. they ache to the point of numbness now, which is something new.

what else has been happening. hrm. well you can go to my flickr and view some pics of some beautiful dolls. had an outing last saturday, 'twas great fun, which is driving me to try and work harder on earning $ so i can get my own.

i have found myself tiring out increasingly easily these past weeks. the thirst simply cannot be slaked (literal thirst) and the tests tomorrow .....well, i get the feeling the results aren't gonna be good. but i guess being sickly since childhood does somewhat numb one into a "ah well" or "ARRGHGHG I HATE THE WORLD" state. right now i think i'm smack in the middle of both. but i have more stuff i'm working on (personal mini projects) and am trying hard to get out of a 'one-trick pony' etsy-store-limbo.

oh and btw, just a reminder, the blog is now hosted on http://snowfern-clover.blogspot.com . ok. time for bed.

g'nite.