Friday, July 19, 2013

Miniature IKEA HUSET furniture set review!


 WOOHOO! Cousin and aunt came over today, and since she had to pick up some items from IKEA, I happily went along, and on the way, babbled incessantly about how I cannot wait for August, the supposed release date for this set. So sorry, but I totally forgot where I first read about it, I do know it was from my FB stream, but I searched and searched and can't find the original link :( 

So anyway, when I came across it, I nearly died from the cuteness!~!~!! Don't care if it's to scale or whatever, it's toooooo cute! The box itself is 19.8 x 11.4 x 29cm (7 3/4 x 4 1/2 x 11 3/8 inches).

SO cute, my friend thought it's supposed to come with 2 sofas, but actually it's the sofa and the slip cover XD 

 so cute. the box has printed and punched drawings to use as background props!
 picture frames, books...
 mirror,.....lamps!!
even windows! a fruit bowl that stands!!! and a parakeet!!!! so cute naaaa~

 Green side table LACK (thanks to those who alerted me to this! it didn't come in green so somehow never connected in my mind XD) is 7.1 (W) x 5.85 (H)cm or 2 3/4 x 2 9/32 inches. As for the yellow chair, I think it's the IKEA PS VÅGÖ, and according to the product dimensions, it has a seat height of 36cm. The seat height is approx 4.1cm (at lowest point, brought out my vernier callipers and stuck it through the hole :P), which makes it approximately 1:9 scale. REVISION: I measured it at the highest seat point, and it's 4.6cm, which means it's rounded up to 1:8 scale! You can view how it scales against my Revoltech Yotsuba, she is approximately 1:8 - 1:9 scale so I think it's a better fit for her :S

FAMNIG HJÄRTA heart cushion is 6cm wide (excluding arms!), although the product info says it's 40cm, i measured the 1:1 item instore, and it was approx 45cm. so that makes it approx 1:8 (1:7.5 actually, but if you haven't noticed, i'm mostly rounding up!) scale. 

I'm loving the sofa and the bookcase. The set also comes with a black and white rug, but I'm not gonna measure that :P The KLIPPAN pink sofa is 8.5(H) x 10.85 (W) x 22 (L) 3 5/16 x 4 1/4 x 8 3/4 inches. This makes this approx. 1:8 scale.

The EXPEDIT white shelving unit is 9.9 (W) x 4.9 (D) x 18.8 (H) cm  3 7/8 x 1 15/16 x 7 3/8 inches. So this shelf is also 1:8 scale.


 Of course, Yotsuba is approx 1:8 or 1:9 scale, which means she's more suited for this set (as a kid, she'd of course be smallish when seated on a large sofa!). 

 The sofa cover is removeable, and held together at the bottom with a velcro strip. 

Which means you can slip it off and replace it with your own cover ^ ^ YAY TIME TO PUT THAT SEWING MACHINE TO USE AGAIN. 

So overall, this has been a totally worthwhile purchase, the IKEA fan that I am :D Although it is rather small for Clover (she's a 1:4 10-12 y/o girl), I'm thinking the playscale/Barbie/Pullip/Blythe fans should have this set in their collection! As for BJD collectors, perhaps this could work for a YoSD, more as 'child-sized furniture'. I'll wait for any of my YoSD collector friends to update with photos :P :P :P 

All items are made of ABS plastic, and fabric made of polyester fibre.

BTW, I purchased this at the IKEA Tampines branch, and heard from a friend that the Alexandra branch has stocks too. It costs 25.90 SGD, and can be found at the Children's section.

For the tl;dr crowd, here's a summary of the measurements, and my rough scale conversions:

  • Green side table - LACK - 7.1(W) x 5.85(H)cm or 2 3/4" x 2 9/32" - 1:8 scale
  • Yellow chair - PS VÅGÖ, 4.6cm or 1 3/4" seat height - 1:8 scale
  • Heart cushion - FAMNIG HJÄRTA, 6cm or 2 3/8" wide - 1:8 scale
  • Pink Sofa - KLIPPAN is 8.5(H) x 10.85(W) x 22(L)cm or 3 5/16" x 4 1/4" x 8 3/4" - 1:8 scale
  • White Shelf - EXPEDIT is 9.9(W) x 4.9(D) x 18.8(H)cm  3 7/8" x 1 15/16" x 7 3/8" - 1:8 scale
EDIT: So after thinking about it a little more last night, I decided to re-measure the PS VAGO at the highest seat point, and TADAH EVERYTHING IS APPROX 1:8 SCALE! those who are more finicky will figure out it's about 1:7.5, 1:7.6 ish, but for the general population i'm sure 1:8 works just fine XD Also, thanks to a couple of my friends who highlighted that the side table was the LACK! :D

YEAH! So although it's hardly strict dollhouse one inch scale, i'm sure there are many mini modern collectors out there who wouldn't mind having this set in their collection. Rather affordable too, for its quality. Just a fair warning though, it is quite heavy. Also, hope i'm not repeating myself, though it's highly probable that someone else has already blogged about this.....I'm just so excited to finally get this WHEEE!!!!!!!

Wednesday, July 10, 2013

DIY Miniature Lathe

This used to be my mother's Singer sewing machine. I spent most of last evening sitting on the floor, screwdriver in hand, dismantling it for parts. You can see how it used to look like here:

http://instagram.com/p/VQVHOvKFyS/

(sorry, don't know how to embed photos from instagram! don't think i can..........:( ) most of the plastic gears had broken, and i figured, it's cheaper to just get a new sewing machine (which i did) than get replacement parts. so i snuck it out of mom's room and took it apart hyukhyuk.

 Rather than muck about with the connections, decided it would be best to keep everything 'as is'. here's the switch.....

the motor...... 

the plug/socket

actually, the light was even kept (you can see it in the first photo)....there's even a short video clip of it in action after the first part of it was put together:

(click above link to view it!)

 The whole contraption was put together in a cheap wooden box that used to be my 'mini' woodworking worktop. the width just so happened to be perfect for the motor! ^ ^ The motor casing has wires sticking out of it at the base, so the four blocks were used to 'lift' it so it rests parallel to the table. 

 Here's the shaft thingy. I have no idea what everything is called, and struggled to find suitable parts on ebay :( Can anyone help with suggestions? I know the shaft is 1/4" and so I should get like maybe a socket with a 1/4" drive, but the collet that I use for my dremel doesn't (and won't) work since that plug thingy (the one with that small screw to hold it in place). It's smooth on the inside, no threads so there's no way for me to secure any other parts to it either....

....instead i used my hot glue gun to try and hold the rod in place....it kinda sorta worked but since there's no way of placing the rod dead centre my initial turnings were kinda wonky T-T

The idea is not mine at all! I had been looking for an affordable lathe for a beginner, and since I have no intention of becoming a woodturner it seemed quite a costly investment (USD$500 after shipping!? might as well get a Unimat, though am not sure i'm ready for that either). So a quick search on Google threw up quite a number of DIY ideas, the one I especially liked was by Youtube user Kula Moku (pyroneph)


TBH, I think it was his old craft blog with how-to on making molds from silicon sealants that led me to his videos and I tucked the idea at the back of my mind. He has all sorts of cool videos on DIY and How-Tos, check out the one where he converts a coke glass bottle into a drinking glass! yow! makes me nervous thinking i'd have to drink from it, but the technique is cool!

here's the video where he shows how to put everything together. 


Also, back then when I was researching lathes and drill presses, the room setup didn't quite allow for more machines. Not that it does now, which is why I'm glad this contraption is so compact it fits in a Daiso shoebox WOOT WOOT


So after initial playing around using acrylic rods (from Art Friend), it became evident that a better way to secure the rods that were larger than the hole was necessary. that, and finding the centre :( short of rushing down to the DIY store, which I also highly doubt would carry what I need, decided to go ahead and add the last part, the uhm, forgot the name. dead centre? anchor? 

uhm. this part. found a 1.5cm square length of wood in the storeroom, glued, screwed and nailed this part together. the bottom length is adjustable and was clamped down as i worked on that teeny 4mm diameter dowel.


the results were MUCH MUCH better just with that holding the end down, which makes me think maybe i needn't worry that much about finding an accurate centre, this isn't precision work after all. but it's still very irritating having to pluck out the dried hot glue stuff each time i change the rod. grr.

as for the carving tools, am still learning how to hold it against the turned item, and i think the next thing to learn is how to sharpen them :-/ as you can see, everything fits neatly into a shoebox ^ ^

i hope to have better results tomorrow, will see if i can turn like, a bowl or plate or summat. WISH ME LUCK!

p.s. no animals or Cindys were hurt in the process :D

Friday, July 5, 2013

1:12 Miniature Dimsum Steamer Baskets, DONE!

 Look at me, blogging more than once a week again ;) I got a momentum going and made more steamers in various sizes, 1/2, 3/4 and 1 inch diameters!

 enjoyed the weaving process, though the preparation of the bamboo bark is quite a pain. went with the chevron pattern again :)

I started weaving the lid last night, and my eyesight has never been good (astigmatism) especially at night, and hadn't noticed the colour difference till it was done *heavy sigh* I know it's kind of 'realistic' but there's just this stupid niggly bug in my brain that craves uniformity and symmetry. yeah yeah, you know this of me already. and I'm SUPER SURE many of you miniaturists out there are THE SAME so 'fess up!!! ;P


wanted to weave a base for the larger 1" steamer, and turns out the same chevron pattern can look quite different! ^ ^ super happy.

my attempt at an arty-farty shot of the base. added 3 strips for 'reinforcement', thinking a foot wide steamer would need it eh? i think it's purty.

I am going to write a full tutorial for these and put it up on Etsy, but not so soon. Will have to figure out lighting issues first heh :-/

now I'm craving dimsum, and there's no good stalls nearby. MEH! the perils of being a mini-food maker XD first world problems.................*mental kick to own head*


Wednesday, July 3, 2013

Miniature Dimsum Steamer Basket


Hello!~ It's SO GOOD to be back working in 1:12. :D I spent more than 9 hours making this set of dimsum steamer baskets. You can view a short video clip on how well it stacks up over on my Instagram :)

It is 1/2" diameter (1.25cm) and made out of bamboo strips (which I got from Daiso ages ago!). The hardest part is the weaving of the cover portion, I didn't want to do a typical crossweave, and though I did a google search for how to weave chevron patterns, my patience wore out quickly (less than 10 mins haha) and decided to just GO FOR IT.


2 splinters and a dusty workspace later, TADAH~! DONE
more failures AIEEEEEE OTL

It's been really nice getting back to 1:12. so many ideas bouncing around in my head. Also, ordered some more resins and silicon pours from Wee Tee Tong,  (you can read about my earlier misadventures with moldmaking here), and am shopping around for a good reuseable mask. I'm thinking of getting the 3M 7000 series, but with filters and attachments and whatnots, it's gonna set me back SGD$100++ :( grarggh. this minimaking thing is like some RPG, keep having to earn gold to upkeep and upgrade my gear. hnnnghhhhhhhhhh. and i HATE grinding!!! T-T

ah well. really oughta go concentrate on getting more done. IT'S SO GOOD TO BE BACK!~!!

(seems traffic here has died down somewhat, guess instagram and facebook has something to do with it :-/ do people still read blogs at all!??)

Wednesday, June 5, 2013

I'm back! And in time for Singapore Doll Carnival 2013!

Okay, so this isn't in 1:12, but for the next few months, I will be working on larger scales! Read on to find out why! (cross posted on the dolly blog)

~~~~~~~~~~~~~~~~~~~~~~~~~~~~~~~~~~~~~~~~~~~~~~~~~~~~~~~~~~~~~~~~~~~~

Okay, these aren't for the carnival, they are part of a commission which my very patient and lovely customer had asked for! I've already showed the pastry/cakes portion (mostly via my Instagram and Facebook page), but the commission also included a wide range of foods, many of which I have never made in mini before, so alot of time was spent experimenting on textures and new techniques, partly why the whole commission took so long as I re-made quite a number of items as I was dissatisfied with the results. :X 


 Miniature 1:3 scale Schnitzel, air dry clay
 Miniature 1:3 scale sausage platter, with salads and sauerkraut (?), air dry clay
 Miniature 1:3 scale potato side dish. I've never been too fond of potatoes up till recently, maybe this was the trigger!!!, air dry clay
 Miniature 1:3 scale borscht (supposed to be beetroot + beef too?), air dry clay + epoxy resin 
Miniature 1:3 scale apple strudel, air dry clay

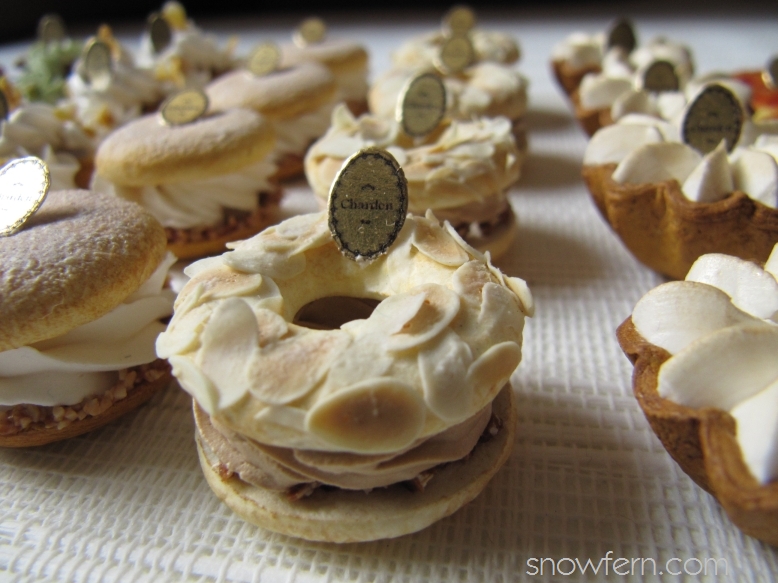
1:3 scale miniature boutique pastries and cakes. air dry clay. 
so here's the pastry portion of the order, all made with air dry clay :) for those who ask about what brands I use, you can check out my FAQ here. I'm sorry but it's just too involved with too many steps to make tutorials, and if I ever do want to get that book done, gotta leave some information for that to happen right? XD am entertaining the idea of making individual tutorials for sale, but given the various scales and mediums I use....am unsure of where to start :( just thinking about it........*mind wanders off again*
 Miniature 1:3 scale Arabica
 Miniature 1:3 scale Elysees
 Miniature 1:3 scale Plaisir Sucre
 Miniature 1:3 scale Apple Tarte Tatin
 Miniature 1:3 scale Corolle Feuilletee Caramel
 Miniature 1:3 scale Paris Brest
 Miniature 1:3 scale Chou Chantilly Nougatine
 Miniature 1:3 scale Caramel St Honore
 Miniature 1:3 scale Pistachio St Honore
 Miniature 1:3 scale Raspberry St Honore
Miniature 1:3 scale Chocolate St Honore


healthwise, I'm still recovering from a recurring shoulder injury, made worse by an impromptu table-tennis session with bro and dad :O BUT THERE IS NO REST FOR THE WEARY or depressed or in pain cos......

I WILL BE AT A DOLL EVENT OMG FINALLY ANOTHER ONE AND THIS TIME I ACTUALLY HAVE A DOLL *insert rabid-drool laughter here*


Singapore Doll Carnival 2013 !!!! Asuka and I will be back together, sharing a booth, lots of laughter, and general merriment :) Do drop by our table to say HI! :D Tickets should be made available soon, do check out the website if you wish to visit, or even be a booth holder. :) There will be photo competitions for doll-owners who can also rent a booth to display their dolls! It's all at an accessible *scape, one day only! C'MON SINGAPOREAN DOLL OWNERS COME OUT AND PLAAAYYYYYY

(am I overselling it? haha! just too excited la!)


I've already started on some new items for the event ;) 

Oh, and remember these? I hope to list them sometime this week, if they're not reserved first.....am finishing up some other items, the ever popular macarons/ispahans for one......and then a new item.....oh man i've got too much going on!

DINNER TIME

/head throbs in anticipation of all the flurry of activity that's going to happen next few months!