Showing posts with label tips. Show all posts

Saturday, September 4, 2010

Tips: Silicone Rubber Molds, i have to remember my own tips XD


WARNING: Technical post, expect usual crabbiness!! :P

in a previous post here:


http://snowfern-clover.blogspot.com/2010/04/112-pastries-breads-danishes-i-dont.html


i related how i had to get a different sort of silicone rubber than the first time i bought them, in this post:


http://snowfern-clover.blogspot.com/2009/08/i-have-had-difficulty-sourcing-for-good.html

 being the semi-disorganized person i am (i refuse to outright consider myself disorganized, i know where everything is in this organized pile of mess!), i don't think i mentioned where i got the material from, or if i had, it's probably in my comments. so to those in Singapore, you can purchase 1kg portions from:


http://www.weeteetong.com/

directions to the place are in the website itself, and it's best you call the salesperson before heading down to, as i like to put it, "jalan ulu ulu". i'm trying to translate that phrase, best i can come up with is "middle of ****ing nowhere" :P i tend to exaggerate, i know :X

ANYHOW. before i start on my personal experience, if you're wondering where you can get more comprehensive knowledge on moldmaking, please please PLEASE go HERE:


http://www.hirstarts.com/moldmake/moldmaking.html

it has EVERYTHING you need to know, kinda sorta. i picked up whatever i know from that totally awesome site, and then wasted lots of material experimenting and adapting to local climates and conditions. so whatever i experience, please keep in mind that i'm in Singapore, and climate conditions definitely affect the pouring of silicone and resin etc since i don't have any of the funky machinery to help me remove bubbles and measure out the portions with extreme precision.

as always, proceed with caution, and i refuse to answer questions because.....hahaha i don't really pay all that much attention to what i do, this is my way of trying to REMEMBER what i did so i don't repeat the same mistakes again :( SUGGESTIONS ARE TOTALLY WELCOME THOUGH!!!!!!!!!!!!!!!!!!!!!! need all the help i can get....

Below are notes on RTV 589 vs RTV 585 (the first batch i purchased)

- RTV 589 is definitely softer and more pliable than 585

the catalyst is pink, so the resulting pour is a lovely strawberry yoghurt colour (i RIKES!). this is a good/bad thing, depending on usage. for recordkeeping purposes, i'm gonna flat out state that i would prefer 585 for larger, uneven items since i can stick in the clay and expect it not to distort that greatly. of course, if you use ADC, this wouldn't really matter. and either one for smaller resin pours. so for even larger food items, i probably have to stick to alley goop, which is a 2-part silicone putty and you can get that from clayalley.com. it cures firmer and faster than any silicone pour, although the learning curve is...a little trickier depending on the temperature of your surroundings and your hands. anyhow, that's another post for another day.

- take into consideration the size, detail and space between the items to be molded

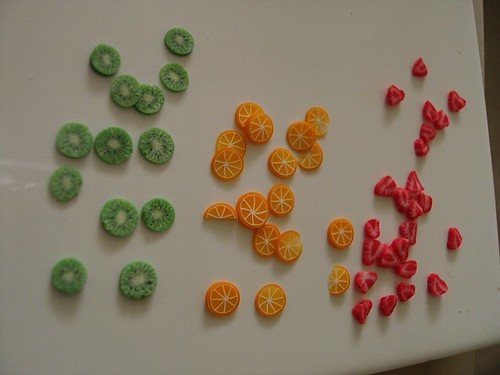
i made the mold pictured above for 1:12 macarons, raspberries, eclairs, danishes etc, and in order to conserve on the amount of silicone pour used, i tried to squeeze in as many items as possible, into as little volume of mold as possible, but that also means that the mold itself is more flexible than if i used a larger container. and because i did that, i messed up my 1:4 and 1:3 molded items (not pictured), as i used the same container to make it. 589 was too soft for me to use polymer clay in it. i could have spaced the items a little better, resulting disaster is the price i pay for impatience and stinginess :P

- pick the right container

i used to use lego blocks, as suggested by the Hirst link i gave earlier, but after a while i've found it to be too much work for items that are so small. some japanese miniaturists i've seen use recycled milk cartons, properly cut and sealed with duct tape etc as the cartons are waterproof, and that's great and all, but again, i had plenty of sauce containers, and i tend to pick a clear container (this time, it was a PP  polypropylene plastic box from Daiso) since it's easier to see if there are bubbles trapped at the sides of the masters. i didn't choose a hard plastic in case the thing got stuck too firmly. ionos. the great thing about inverted sauce/takeaway containers too is that they are clear, and all you have to do is pop the lid off and push out the mold. naturally, i cut off part of the container to allow pouring. if you're confused about what i'm referring to, you can probably google for moldmaking with recycled margarine containres, plenty of resources out there (and probably where i got the idea from, but most likely cos i was lazy and just have too much crap lying around that i could use)


- make sure the items are properly adhered to the base of the container


if the master shifts during the molding process, not only do you 'lose' the item, fishing it out before the molding material hardens is a sticky and messy affair, and if you try and extract it -after- the silicone rubber has hardened, you risk ruining the entire mold, or the master itself. with a 1 pour mold, you could probably follow faithfully the steps suggested by Hirst, but i am always too excited to get it done that i hate too much prep work :X that's why i fail so much! LOL anyway.....

i had previously used double sided tape, that worked pretty well if you didn't care about the unsightly surface, and wanted a quick and dirty pour. well, i messed that up majorly with this pour :( i thought i hadn't mixed enough catalyst in, and so placed the poured mold near my laptop, which acts also as a heat source since this machine freaking heats up real fast even with the fan underneath it. i'm not sure where i got the idea that heat speeds up the process, but i think it stands to reason, after all it is an exothermic process, and the heat generated helps the rubber itself to cure. any physicists or chemists out there want to help me verify this? XD anyhoo, my point is, the double sided tape melted and created this gooey mess on the base/surface of the mold that try as i might, could not fully clean off. :( :( :( i took my blade and sliced off as thinly as possible the top layer, after scraping off whatever gunk remained after i let it soak in rubbing alcohol...alas, it is only marginally helpful, it's no longer that icky gooey and most of the glue residue was removed after 4 hrs of carefully cleaning (i really should try out the WD40 but ...the smell of that stuff makes me wanna puke) the surface, i gave up and prepared a new pour. i'll still use it though, for as long as i can tolerate the icky texture XD

- get the ratio right!

i think there's always an 'optimum' amount to mix such materials, like i've mentioned, the heat generated factors into the cure rate, not just the amount of catalyst. well, that's my opinion anyway for epoxy resin. but for silicone pour, i think it's even trickier, as soon as the catalyst comes into contact with the rubber, reactions start happening, gah! if you don't stir rightaway, or if the silicone rubber has been sitting around for a while (there's always a shelf life for silicone rubber/epoxy resin, as far as i know anyway), the resulting pour can clump up before you even attempt pouring :( the suggested ratio for 589 was 2-3% of the silicone rubber portion, but i think that's for amounts larger than 1-2kgs. for this pour, only approx 20ml was used!!!! i tried to play safe by keeping it to a 1-1.25% ratio for our climate, and oh boy, does temperature affect the pour. when i first tried out 589, Asuka was around to help me, and we were in my air-conditioned bedroom. that was a pretty successful pour, with the room temperature at approx 18-20 deg celcius. the weather this week has been hot and humid, and i don't usually work with the air-conditioner on, so i totally forgot to factor it in, and TADAH IT CLUMPED. i was frustrated, and thought back on all the possible variables since i kept the ratio the same, and so tried again today with the airconditioner on. PERFECT. no clumping. oh, and if you can, invest in proper measuring tools, my goal is to get an electronic scale.....soon...soon :( no place to keep my tools!!!!

- keep the stream thin while pouring, and TAP TAP TAP. this is to get rid of any bubbles that could have been introduced into the mix. i got tired of the tapping process, so recently i took to running an old epilator against my work surface (which is usually a box, to introduce further reverberation) LOL. don't judge me!!! i can't always have the washing machine running! XD and yes, the epilator is clean. :-/ freaking effective, just really noisy.....alternatively, you can place the container against a fan, which is what i used to do until i got this new table = no space for fan XD

- use wet wipes to clean up spillage

if any. XD

ok i'm sure i missed out other stuff, but this is a sorta 'newbie' post still, i'm still making mistakes and figuring out what i'm comfortable with....so remember, even if you fail the first time, you have to keep on trying!!! conditions of your environment are SUPER important when it comes to working with temperamental materials such as silicone rubber and epoxy resin!

comment if you've found this useful, or made it through the post without falling asleep ;) i know Asuka probably didn't even make it past the first paragraph ;P *snort*

===================

UPDATE!

the 2nd mold set BEAUTIFULLY i am SOOO pleased with it! so far, i've tested it with ADC and the results far exceed my expectations ^ ^


gonna update again with pics of some glasses and bottles woot woot!!!!

Thursday, July 22, 2010

the different scales i work in.....

Part 1 - the different scales, and how i get to the measurements

these are in 1:3. i have had some people ask me what scales i work in (with?), and others were kinda confused too, and i do apologize for not being clear. i started out with what i -thought- was 1:12, after i found the world of dollhouse miniatures. i have found that each scale has its own challenge, and also some technical issues to be aware of. ready? here comes the math lesson.....XD


the smallest squares on this cutting mat are 0.5cm wide. starting from left most, are my latest kiwi cane slices in 1:24, 1:12, 1:6 , 1:4 and 1:3. the thinnest cane is in 1:48. you can probably tell by estimating that the measurements are 2mm, 4mm, 8mm, 11mm, and 15mm. so mathematically speaking, in real life, the dimensions would be:

1:24 - 24 x 2 = 48mm = 4.8cm
1:12 - 12 x 4 = 48mm = 4.8cm
1:6 - 6 x 8mm = 48mm = 4.8cm
1:4 - 4 x 11mm = 44mm = 4.4cm
1:3 - 3 x 15mm = 45mm = 4.5cm

how did i come up with the measurements and how come they are different for the larger scaled items? for me, i tend to work backwards. i usually pick up my ruler, and guesstimate how wide the fruit should be. so, excluding the rind/skin/fur (??) of the kiwi, we can say, it ranges between 4.5-4.8cm wide. now, i could be really finicky and go further into the 2nd decimal place, but feh, my math isn't that great and my ruler doesn't go beyond 0.5 mm divisions :P

since 4.5 is easily divided by 3, i went with that for the 1:3 scale, and reduced my cane accordingly. i usually start out with a 1:2 cane, and reduce from there. so you can probably guess why i went with 11mm for the 1:4 scale right? XD XD XD

but wait! 4.8 is also easily divisible by 3, AND 4, why didn't i use that then? well. for larger scales, i have found that it is better to work in -slightly- smaller dimensions for a few reasons:

1) fruit sizes vary, you can get away with smaller fruits, but larger ones can appear 'clunky' (at least to me it can) so i prefer to work in a small-medium size range
2) uses less clay
3) cane needs to be reduced quite a bit to make sure the separate clay pieces adhere properly with each other, in case i had accidentally introduced air pockets while assembling the cane
4) i don't like the number 6, and 16 has 6 in it :X so i tend to avoid any measurements with the digit 6 in it. strange, but true fact about me! (my fave number is 7, and i love other prime numbers too)

uh. yea that's all i can think of for now with regards to the above.

(i think i'm the only one who bothers thinking about stuff like that and even blogging about it. meh this post is so dry, i know...)

next section touches on the various scales i work with, rehashing some stuff you might already know by now................

===============================================
Part 2 - what the heck are all this 'scale' stuff you are talking about and why does it matter anyway?!? small = CUTE! SQUEE!!!!


VERY TRUE! SQUEEE!!! however, if you are selling miniatures, it is important to -know- what scales you are working with. what looks good on your favourite mini plate might not fit as nicely onto your customer's fave mini plate. heck, some people don't care, and for those of you who don't....ahhaha i don't think they even made to reading this far XD

so. why these scales then? why not 1:10, 1:8, 1:14?? why are these so special, you ask??? here's what i've learnt so far, i could be wrong, but you always have google and more knowledgeable people to verify....:P

1:12 aka scale dollhouse miniatures aka one inch scale
to put it simply, in doll size, 1 inch = 1 foot real life size. and since 12 inches make a foot...TADAH! i guess the serious dollhouse collectors started out with imperial measurements, not metric like we're (i'm) used to here :(

this term also applies to 1:24 aka halfscale or half inch scale, 1:48 aka quarterscale or quarter inch scale, and even 1:100 and 1:144 i think, aka micro scales.


the commonly accepted scale for dollhouse miniature collectors. if you do a search for dollhouse miniatures, it is likely you will see the vast majority will state that their items are 1:12 scale. this is my favourite scale to work with :)

1:18 1:16 (thanks, Pubdoll!)
 i stumbled across some flickr photos of some awesome awesome miniature furniture, but realised they weren't the more common 1:12 scale! how very strange! what is this "Lundby"?!??! ah ha!!! a quick visit to googlei edumakated meh ril quik!


http://pubdolls.blogspot.com/

UPDATE: WIKI IS WRONG.....it is 1:16, not 1:18! -_-" for more info, and examples, please go to Pubdoll's blog, i had to stop looking, i was getting into a state of serious "I WANT-itis".......which would be detrimental to my state of "i-have-no-space-to-store-'em-itis" T_T ok i lie. i'll probably be another silent stalker :E all this coveting is gonna be the death of me......


i think they're great, and much of their furniture -should- work with 1:12 roomboxes. i prefer my items slightly smaller than -strict- 1:12 anyway, so i'm looking forward to owning a Lundby house. someday, someday T_T i have no space to put my growing pile of materials and tools!!!

oh sorry. where was i? dangit i got sucked into that site.......

i have never made 1:16 scaled items. i might try some day. just for fun and to see the difference.

1:6 aka playscale
this scale is what i grew up with, playing with Barbies!!! her body dimensions are definitely off *grins*, but most of her accessories etc are at 1:6. Re-ment, a popular japanese brand of miniatures, is also at 1:6. but some items are small enough to use at 1:12. i found a wonderful site that tracks such items, i'm afraid of going through the site, it'll just fuel my insane desire for more re-ment items. not food though. i started making my own minis cos i hated the plastickiness of re-ment foods :P


not a popular request, due to the ease of availability of props. hence not a scale i work with often. nor a scale i'm entirely comfortable with, but probably cos it looks clunky after being so accustomed to 1:12.

1:4 and 1:3, aka MSD and SD sized

the MSD and SD refer to "Mini Super Dollfie" and "Super Dollfie" respectively. not all ball-jointed dolls (BJD) are MSD/SD, but MSD/SDs are BJDs. confused? read more about it here


and here


i had to figure out the differences as i started selling more of my works to doll collectors, so i guess, if you are thinking of selling in larger scales and don't know the difference, it is time to start knowing? :X


alot of the 1:4 items could work with 1:3 dolls, just like 1:6 work for 1:4, but not that many people nor commercially available props are in that scale. i started making larger scaled items for TDA '09, my first (and only, so far) miniature-related event! it is the only relatively-high-profile miniature related event (that i know of) here in Singapore, and since i have been wanting to own a BJD for like, forever, i took the plunge and participated.


i really. really. really want an Unoa Quluts. Sist or Lusis, i haven't quite decided. not that it matters, they're so costly, my teeth hurt.

(wonder if i put up a paypal donate button i'd get anyone to help me on my BJD quest? XD )

there you have it. why i work in these scales.


AHHH TOO MANY WORDS! even -i- wouldn't have made it this far without pictures :P i'm working on some 1:3 items, this is as much as i could get done with my very, very, -very- sore hands/wrists. i stupidly rolled out some clay colours instead of using the pasta machine, and now both palms are bruised :( washing dishes today...was indeed a challenge XD i didn't break anything though, go me!

ok enough of talking to myself. tomorrow, i'll be having a mini meet-up, SO EXCITING!!! a good excuse to let my hands heal up! i will be roping in Sans and Asuka to help me do some chopping too, my hands can't take it anymore LOL

p.s. my next 'technical' post should be about differences in working with 1:3 vs 1:12. donno when that'll be. would anyone be interested in reading that, or should i not bother?

Tuesday, April 6, 2010

Tips on Caning

i haven't actually done all that much caning, as in, when i first started out, yes, i did make loads of canes. oranges, strawberries, lemons, kiwis. all of which when i remove from my container of shame, i cringe at how bad they were. but as in almost all of my clay endeavours, i seldom if ever succeed on my first try. compare and contrast:

the above canes were done before May 2009. orange canes were my first ever canes (not depicted here, you'd have to plough through my flickr account to see how horrific they were :P ). i followed Angie Scarr's really wonderful tutorials (look for the free tutorial links on her site) and as proud as i was of them back then, i knew there was room for improvement. the kiwi slices were kinda hodgepodged together, as with the strawberry slices, although i did take a few tips from Marjo Caris. along the way, i've seen truly realistic and awesome cane slices that deviated somewhat from the ones taught in popular online tutorials and books, so i figured, heck, i might as well start experimenting with my own versions of fruit canes rather than produce the more 'typical' sorts of canes. after all, i think i'd figured out the basic techniques.

the following tips are stuff i've come to slowly notice is truly important to -my- caning process. i stress this because i know there are plenty of tips available on the net, but due to individual brands of clays' properties, and the climate and conditions i live in (tropical, non-airconditioned room) i've had to struggle with finding the best clay suitable for my warm hands, and how to obtain the colours i want.


also, you might find that these tips are 'too much' as in, some aren't really necessary. but owing to my nature, i like things to have a certain consistency. and improving upon basic techniques helps reduce wastage :) well, if you are following a book/tutorial, they should pretty much have the basics laid out for you, but i don't follow any particular method nor do i own any books, so these help me in -any- sort of caning i do.

here are pointss i always try to remember:

- avoid air bubbles

while conditioning polymer clay, and assembling the cane, be careful not to introduce air bubbles. air trapped in the cane would result in holes in the cane, and distortions to the general shape. unless you -want- the bubbles, although i have no clue how you would control the reduction of the canes.

- keep to 1 brand of clay for each cane
since it's always warm here, i favour KATO polyclay. it's harder than any other brand of polymer clay i've tried. i use mainly translucent, and i've also got a pack of primary colours (red, blue, yellow concentrates) and green, since i'm terrible at mixing green. this tip is to ensure that during the caning process, the clay's hardness is evenly distributed throughout the cane. if you happen to have clays of different hardness/softness, the way the clay shifts throughout the clay will be uneven, winding up with distortion.

- test bake colours before starting on your cane
for the less experienced (i.e. me ha ha!) or those who mix up their own colours, i highly recommend testing a small pinch of clay for each colour component of your cane BEFORE you start assembling and reducing your cane. most of my earlier canes turned out chalky and almost cartoonish since i didn't know what ratio of translucent clay to use vs coloured clay. i flatten out a small ball of clay to the thickness i wish my slices to be, and bake to see how it would look. this helps reduce wastage of huge batches of clay.

- rest the clay before reduction/cutting (raw canes)
before reducing your assembled cane, try to let it rest for a while so that the temperature of the cane is evenly distributed. this is because the outermost layer would probably be softest as the clay has been in contact with your hands. if you are slicing your canes before baking (i do that for my citrus canes to give them a little more texture), make sure your canes are firm. i keep an icepack handy and plonk my canes on them before i slice. i usually only get a few slices out before i have to re-cool them, so i keep about 2-3 canes on the ice pack and rotate the canes during the slicing process.

some people recommend warming the cane up thoroughly with your hands before reduction, but i've found that makes the cane reduce too fast for my liking. who knows, it might work better for you :D


- use end caps
i recall some polymer clay caners use glass end caps for reduction. i didn't use to do that, i simply pinched and pinched and wound up with oddly shaped ends, hence more wasted clay. for my more recent canes, i used 2 tiny round ceramic tiles approx. 3/4" diameter on each end, and went at it. this method also ensures the clay is evenly distributed and drawn out along the length of the clay, as the end caps create a vacuum for the non-visible gaps between different colours of clay.


- pinch and pull, not roll
resist the urge to roll the cane. although that process helps smooth out the clay, it should really only be used after you've gotten the cane down to the size you want. rolling the clay results in uneven distribution and creates a 'swirly' effect, so unless you're making candy canes and the like, i really wouldn't recommend it.


- make sure you're baking the canes at the correct temperature
oh boy i learnt this the hard way. for the longest time i kept wondering why my canes were brittle. when i initially experimented with caning, i mixed up all sorts of brands of clay, depending on what colours i needed. bzzt. bad move. some clays require a higher baking temperature, and since i was always fearful of charring my clay, i'd baked at a lower temperature (for a longer duration). however, my canes were mostly brittle, and consistently chipped while slicing. well, i know better now :-/

- let the canes cool in the oven
some people prefer to slice their canes straight out of the oven as the hot clay is softer. i work with a fan blasting at me at all times since it's mostly warm here (23-28 deg celcius), and the canes often cooled too fast. this makes for a more brittle cane. i tested it out today on the kiwi canes, and there -is- a significant difference to the hardness/brittleness of canes that have been left to cool in the oven vs one that's sliced fresh from the oven.

--------------

ok that's all i can think of right now. i'll probably add more or adjust this at a later time. hope this was helpful to you :) if it isn't, too bad, it's helpful to me and my failing memory XD XD XD