Showing posts with label Japanese. Show all posts

Wednesday, February 25, 2015

1:48 scale miniature Japanese Teatime items

Happy Chinese New Year of the Goat everybody! It still is Chinese New Year as we supposedly celebrate it for 15 days, but the busiest few days, i.e. New Year's Eve thru till 2nd day of Chinese New Year duties are done with, and the last time for me as I will technically be part of a new family next year :) 

Woah, so many months have passed since my last post, and not much done :( Healthwise, things are still a little more than hinky, but I am trying to motor on with the help of proper dosages of painkillers. Between November and now has been a hazy blur of unbearable ladypains (re: adenomyosis/endometriosis), colds, an upper respiratory infection that wouldn't go away for more than a month, and my old laptop of more than 5 years giving up after I caused a blackout with an improperly plugged in UV lamp :X The weather has also been a lot chillier and wetter, for a lot longer than usual, but it finally warmed up this week, enough for me to head back to the pool to lose the Chinese New Year weight gain :P So I tried my best to continue working on requests that came in last year, while I am able to.......

The good thing is, this lovely customer emailed me last July, stating that she had no problems waiting for this order, and I thoroughly appreciate that. I went about creating the smallest items I've ever attempted!!!


The masters for these, which I have since lost, were turned on my IKEA drill, which has also died :( The humid weather is killing all my electronic gadgets!!! Ah well. As you can see, they're about 2-3mm wide, and I cast them in epoxy resin, because I was fearful that clay would be too fragile at that thinness.....

She had also requested some floor cushions and a tatami flooring, found a lovely floral bias tape with patterns small enough to work for the cushion, and finished it off with a teensy weensy gold knot in the centre. Loving how it turned out! Each is barely 1cm square.

(table is an old Sylvanian family item I collected more than a decade ago! might have been a stool from a sewing machine set, or table from a micro sofa set? or is it Re-ment??! Auf, can't remember, but it's not made by me is what I meant to say.....)

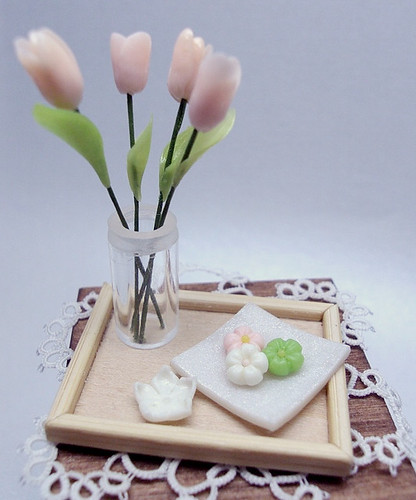
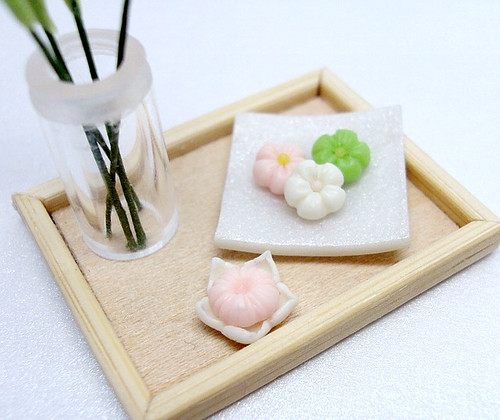
1:48 scale miniature Japanese Tea Scene, UV Resin, Epoxy Resin, Polymer Clay, Cloth, Inkscape, Paper, Acrylic paint

Fired up Inkscape and heavily modified a free tatami texture I found online, did up a sample by scoring along the lines but at 1:48, ey, not sure why I bothered. :-/ I'm not sure if you can see but I've also detailed the Usagi Manju (Rabbit Steamed Bun) with red eyes and brown ears, and the sakura mochi has a teeny yellow centre and detailed indentations.....kind of difficult to detail items approximately 1mm large..... *squints*

I debated over the green, and decided to do a darker and chalkier shade so it 'pops' more, especially since it is sooo tiny, but in contrast, the pink of the mochi seems a little pale in photos?! It is a few shades darker in real life, I promise! Looks like my photography skills have reverted to n00b status after such a long break T-T

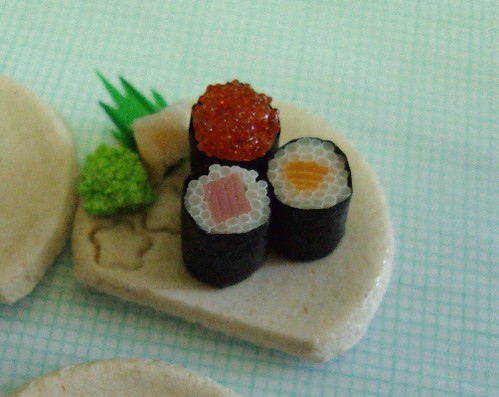
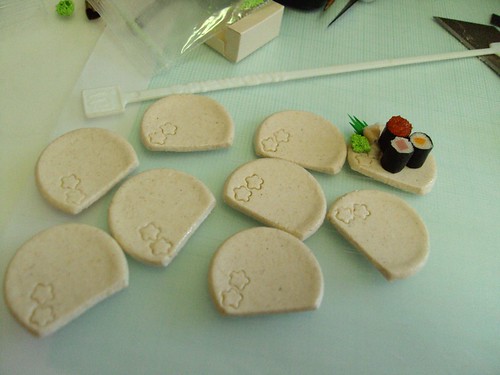
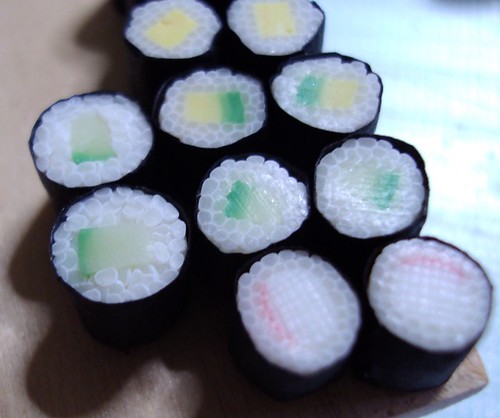
OKAY enough self-flagellation, I have another large-ish order which I'm mid-way through, but here's part of what I've completed :) It's 1:6 scale, which I am not often asked to work with, so it posed new challenges for me, which included sculpting with air dry clay since no batch work was necessary!

1:6 aka playscale assorted sushi, WIP. microbeads, paper, acrylic paints, oil based paints, air dry clay, UV resin

Ouf it's almost March.


Saturday, April 17, 2010

1:12 pastries, breads, danishes (i don't know the names!)


i'm trying to get some prototypes out of some breads, danishes etc....it's more to get comfortable with working with the various mediums, and give my customer some ideas of what she might like. all items in 1:12 scale, mostly air dry clay.


i forgot to include an item for scale, but look! an ant happened to stroll by, so it shall be my marker XD i finally got the croissants shaped the way i like them (top 2 are the latest tries) but i think i still need to work a little more on colouring them better.

no matter. the ones i don't like will become choc coated croissants *grin*


and here are the prototypes. my favourite has got to be the swirly one at the bottom. i used to have that with each visit to Delifrance, way back when i used to enjoy the food there. the square ones are my first run at colouring the danishes, i don't like it all that much. i prefer the pains du chocolat (sp?) and the roll thingamabob colours ^ ^ the breads i found to be the most challenging to colour, cos there seems to be sooo many varieties and many of which i seldom see. yeaa i don't get out much .......


i used air dry clay for most of the works depicted here. i think they produce the most realistic breads/pastries in minis. i will test run a batch in polymer clay tomorrow (?) if i have the time. one of the biggest problems with ADC i find is the long drying time. :(

the left most is supposed to be coated with sesame seeds, i grated up some sesame seed coloured clay, but after giving it a coat of matte sealant so that it doesn't fall off, the colour seems to have melded in with the breads! ohnoes! will have to discuss other possibilities before i proceed. my customer provided me with plenty of beautiful pictures to work with, but i wanted to get out a few prototypes before actually getting down to the order. am waiting for some other stuff to dry too, need to paint them up. brown is a tough colour to mix up :( :( :(


heeee a closer look at my 2 fave pastries! ^ ^


these i filled with polymer clay and polymer clay fruits etc. see the feathered one there? LOL it 'puffed' up when i put it to bake in the oven! the bases are ADC which i'd left to dry for almost a week, but still......:O luckily, that was the only one that bloated. the ADC bases shrunk further after baking, which might or might not be a good thing. again, although i really like ADC for the danishes, i think i have to seriously consider switching to PC if i cannot control the shrinkage/bloatage etc...

waiting for the other batch of 'better' coloured square bases to dry fully before i decorate them. i have another shape that i forgot to fill, didn't know if i would ruin these 6 during the baking process, but now that i see they've somewhat emerged intact, i think it's safe to proceed.

for those who might be keen on making the danishes, i learnt how to make them via tutorials from this wonderful webpage. it's in japanese, but you can easily use googletranslate or similar, but i find the pictures to be more than sufficient. she uses air dry clay, but again, the methods can be easily adapted for polymer clay.

http://donguricake.bitter.jp/main.html

at the bottom frame, there's a 'how to make' link. :)


'tis been a hectic but fun week! Asuka and I went adventuring, and thankfully, we didn't get -too- lost. XD managed to finally pick up a fresh batch of silicone molding material.


remember this post?

http://snowfern-clover.blogspot.com/2009/08/i-have-had-difficulty-sourcing-for-good.html

well, they ran out of the RTV 585. so i decided to try my luck with RTV589. the cool and funny thing is that the catalyst is pink, so the mold turned out...strawberry yoghurt coloured! Asuka came over and helped me with it...and the whole time we were like "hrm....smells like strawberry". HA HA HA HA HA HA HA HA HA!!! (it's not funny to you but there's a follow-up inside joke that's too gross to bear repeating :P )


anyhoo. weekend's here. time to give the hands a break. have fun everyone! ^ ^

Monday, February 15, 2010

Teensy Weensy Miso Soup

misosoup
am waiting for the resin to set. :)

SLURP!

spring onion
made these last night with air dry clay.

i remember watching a video i found online, and stored it away in my memory till i finally found a reason to use it YAY!

FOUND IT IN MY BOOKMARKS WOOT!

http://www.thaiflowerart.com/english/thaiflowerart/Coating_wire_graded___Making_clay_flowers.html
i followed and adapted the technique used here, using i -think- 28 gauge wire. it's so fine and slightly less than 0.5mm thick. not sure where you can buy it since grandma found it while packing and asked if i could use it. chucked it away for a long time, YAY FOR HOARDING!!!

the whole website is a treasure trove of information. i can't remember when i first discovered it, but i do recall spending hours reading and watching ALL of the videos the lady has posted.

http://www.thaiflowerart.com/english/thaiflowerart/Techniques_to_make_clay_flowers_from_DaisyClay.html

above link shows all the techniques she uses with air dry clay. i think she sells thai clay too i'm not familiar with the products, but all the free videos are awesome~!

the tofu is made from polymer clay, baked of course. and the kelp....well i had a lot of problems with it cos i didn't know how to manipulate green. i have problems getting colours right since i don't buy ready made colours (which will be amended tomorrow... wah ah haha ) and after multiple failed attempts with polymer clay, i thought, "F*CK IT" and painted a piece of tracing paper with acrylics. YAY!

mixed up some ochre/brown/white acrylics into epoxy resin, and voila. miso soup. just wish i had nicer appropriately scaled bowls. time to do some online shopping :E

kk off to CNY lunch with bf's family. imma be late!! :O :O :O

Saturday, February 13, 2010

How I made the Taiyaki

http://en.wikipedia.org/wiki/Taiyaki
http://en.wikipedia.org/wiki/Dorayaki

WARNING: NOT A TUTORIAL, just showing my process. will not be answering technical questions cos i'm a grump like that :X all resources and tips and tricks can be found under the "Important Resources" section in my links to the left. or, you can always consult Google.

i rate this process under intermediate difficulty.

you could, alternatively, just find a fishie charm at some accessory store and mold that, but i want to start *ahem* sculpting my original works and stuff. so....HERE WE GO!

taiyaki WIP

first, sketch out the fishie onto tracing paper. i'm terrible at drawing and after 5 failed attempts i finally got it to the shape i'm satisfied with. then reverse the paper, and trace over the fishie onto some spare polymer clay so the pencil marks the clay. do this lightly.

using all the tools you have at your disposal, in my case, a needle tool, ball stylus and some wire (for the scales bit), gently notch the clay where the pencil marks are. i guess this can be considered sculpting? OMG I'M ON MY WAY TO BECOMING AN ARTIST ZOMGZORZ!!! XD XD XD *snurk*

bake the clay, and after it's cooled, dust it lightly with cornstarch or using a little mineral/baby oil and a cotton bud, coat the fish lightly before molding it with molding material of your choice. i use alley goop, it's a 2-part silicone putty, but i've found that at such tiny scales (*snort*), it has a tendency to stick to the master itself, or not solidify as it should. maybe it's the temperature change, but this never happened to me before until recently :(

not crispy looking enough

here i tested out the mold with some polymer clay, and dusted it lightly with ochre and other appropriately coloured chalk pastels. i forgot the exact shades :( most of the time i just 'eyeball'-colour my works. this fishie doesn't look crispy enough to me, i made this last night.
taiyaki pair 2

this afternoon, i made another pair, but in my excitement i neglected to let the clay rest and cool down before i jammed jam into it. sigh. which explains the broken piece on the left. but i decided to go ahead and use it anyway, to show the red bean filling.


taiyaki pair
kissing fish! i like the colouration of the one to the right. at least it looks more crunchy. that, and i prefer the shape too. did the mold this morning, but it's almost time to set the table for reunion dinner, so can't play with my stuff anymore today ; ; will try and even out the two sides hopefully tomorrow, or later tonight.


so that's how i made the 1:12 Taiyaki!


============================
i really shld make separate posts, but i'm quite lazy, so.....XD

read a book, have a snack
dorayaki! did this for a trade with Yuki/Amatheria. hope to get a set of taiyaki done for him too before i send out the package.


1:2  pineapple tart

and cos i had a lump of 'pineapple jam' remaining from my 1:12 pineapple tarts, decided to make a larger scaled one. this is approx 2cm across, i guess it could pass for 1:3, but in my heart i know it's 1:2 *sulk* will be chucking it in my portfolio for larger scaled items, and will be scaling this down to 1:3 and 1:4.

off to set the table! have a happy weekend everyone :)

(oh yeah, i know it says murder book XD was looking for something to hold up the items and the book happened to be on my bed. yay for libraries and crime mysteries!)

Monday, February 8, 2010

More experiments and sushi

failure to mold

i tried and failed 4 times at molding this bugger with my alley goop. i'm thinking either 1) i didn't get the ratio right 2) it's too small a volume to mold properly 3) i didn't mix it well enough.

but when i did use a larger amount of molding compound, it still messed up. sigh. looks like i'll have to find another way to do this.

it's supposed to be a cookie/pineapple tart base :( the shiny stuff on it is the leftover silicone goop that seems to like to stick to it. :( i never have this problem when molding larger objects. so this is a major annoyance and waste of expensive silicone compound :( if i feel up to it, i might do a resin mold instead. the air dry one i made seems to be -ok- just that the details aren't as refined, and it's bound to deteriorate after i subject to the abuse intended for this 'project'.

less of a failure this time

well this experiment didn't turn out too badly. i tried out the polymer clay + thinner + baking soda method by Garie Sim and it seems to be working fairly well. the thinner is giving me a high though XD

the cakes are displayed on a plate painted by Petitplat which i received as part of a swap ^ ^ i have been really pampered lately, and will do a proper post on all the items i've received recently...

sushi rolls in one third

california maki in one third

and progress on the commission i'm working on. these were the hardest to make of the whole commission. it accounts for why i've 'disappeared' somewhat the past few days. the different parts have to be mixed, baked, assembled, re-baked, individual grains of rice stuck on, re-baked, then the 'eggs' stuck on....i originally was going to make them approx 2cm wide, but realised that would be totally out of scake with regards to the crab stick. these are approx. 1/2" or 1.25cm wide, which translates to 1 1/2" or 3.75cm wide in real life (1:3 scale). i think this size works better with the rest of the sushi rolls....and hope my customer thinks the same too > <

Chinese New Year is approaching, and i'm still quite behind on my swaps and posts...i hope to be back on my personal projects soon i have soooooo many ideas teeming in my noggin!

Thursday, December 10, 2009

Sushi, I'm almost sick of making them

spent much of this morning editing photos to print for the event. i don't plan on making all that much stock, especially of the 1:3 items, and am planning to offer only at most 2-3 sets of sushi, might make more donuts though we'll see.

OK LESS TALK MORE PIX!

manly cakes LOL i don't want to just offer girly stuff!

this 1:3 cake slice was hell to make. it's hollow in the centre to save on clay, and you can imagine how much clay it already uses :( no way am i making more of these unless i'm commissioned to.

the crab stick is a little too large for the maki, i got a tad confused while going back on forth making 1:3 and 1:4 items, messed this up totally. i think it looks ok for a 1:3 scale maki, but there's too little 'rice' :( am waiting for the glue to dry on my 2nd try on these, will post pics when i can.

made some 1:12 petit fours a few days back while mucking about with the 1:3 ones. LOL it was hellish, they are barely 2mm wide....and i've never eaten a petit four in my life either!

the 'fishy' sushi rolls on sushi plates i made from wood clay. i couldn't find suitably sized plates, so these would have to do. only made i think 9 plates though.

for the lesser adventurous, here are the not-raw sushi rolls XD i tried making 1 set of cucumber rolls in 1:3 scale, and they are made differently than the 1:4 ones. i prefer the 1:3 rolls but they're a little tricker to make. i might make more if i have the time or inclination to.

and, a gift from my youngest brother! i was so surprised by it, he remembered that i love Totoro XD no special birthday plans, i nearly forgot what day it was until bf reminded me yesterday. which isn't something new, i tend to forget birthdates anyway XD

Thursday, November 5, 2009

Japanese Sweet Treats


these took 4 hrs to make
Originally uploaded by Snowfern

ok, thanks to Tomohachi, I've been surfing for more and more and MORE Japanese inspirations....and dug up (or did she give me this link?) this website....

http://www.minimum.jp/make/sample/tulip01.html

i left it on my browser for almost a week before deciding to try it out today.

i think they don't look too terrible here, but they are. :( i definitely need more practice on these, and they're a PITA since they don't really 'stick' to the wire. so it seems i must make some prep work before starting on them the next time round.

since i rolled out too many 'dango', i decided to make some more wagashi. they don't sell very well although they get quite a lot of views, and finally, i sold 2 of the wagashi boxes last week! fueled by this encouragement, here i present my new wagashi..... and a mini flower 'dish'! i wanted to colour it but i don't think it's very nice yet (not very even)...

with the spare clay i made a 'chrysanthemum' wagashi....of course, this is going to be a mold for my future wagashi, they are so intensive to make X( i think it looks cute in the flower dish! like a little lotus flower?

the new dango look great IMO! i'm most satisfied with these. the sticks were fashioned from toothpicks, sanded, and i made them a little longer this time. i am still waiting on a reply, so i don't know if i should offer this on my etsy as yet...

ok i had food poisoning today, so i'm still feeling a little weak and nauseated....this is all i can manage for now...*whimpers and goes off to bed*

Monday, October 26, 2009

Introducing: La Cocina Alegre by Tomohachi


I made a new friend recently :) I first came across her site when I went searching for a 'recipe' to make the perfect bread texture....this after Kiva started me obsessing over it over on her blog.

So, with my minimal knowledge of Japanese characters and the help of Google translate, I stumbled across Tomohachi's site.

Reading her english blog amused me somewhat, she has a very gentle sense of humour that I enjoy, and is very sharing with her trial and errors in mini-making! Her blog got me occupied for quite a while since it was full of WIP (Work-In-Progress) pictures, until I hit this fateful post...

http://la-cocina-alegre.blogspot.com/2009/04/rusk.html

now, that's, EXACTLY what i had been searching for! so here we have, a miniaturist who:

1) is generous in sharing her work process
2) takes beautiful pictures of her beautiful works
3) although isn't fluent in English, took the time to POST in English to my (ok, everyone who reads only English) benefit!

as noisy and vivacious as i might appear online, i am rather shy when it comes to taking the first step in making new friends...most of the time i blurt out stupidly what's on my mind and hope the other party doesn't take offence at my tactlessness. so composing an email with the help of googletranslate couldn't be great, communication-wise, for starting off an e-mail, and with the audacity to ask for a recipe for the work LOL but hey! my motto is, "if you don't ask, you'll never know"

and she replied! very positively too! and in such detail on how to achieve the effect! so here it is, with her permission, how she achieved the perfect bread texture ^ ^

I use bicarbonate of soda.
Please prepare a ball of resin clay "Grace" about 1.2cm in diameter and a
ball of Hearty about 2~2.2cm in diameter. Hearty contains a lot of air, so you would use a little more Hearty than "Grace". Mixing to soft, add about two earpicks full of bicarbonate of soda and several drops of water to the clay ball.
Mix again. Shape the clay into your desired shape and place on baking sheet. Put it in the microwave oven and heat it for a few seconds.
The heating time is different depending on the size of the item. I always
heat it for about 20~40 seconds. Please watch carefully when heating. If you succeed, you can see bubbles in the clay.

I have slightly re-phrased her explanation, hope you don't mind, Tomohachi!

Since I don't own a microwave oven, I shall attempt this with my toaster oven, presumably on a much higher temperature setting than what I use for polymer clay. Her tip was to watch for it and don't let it burn is all!

Also, she has also kindly reminded me to keep a few more things in mind:

1) success rate is approx. 90%
2) the clay shrinks a little after baking

I'm so glad I took that first step :) Thank you so much for your generosity, and patience with me Tomohachi! And no, your english is not poor at all, I understand you completely! I do apologize for my poor Japanese though (ok, for that, you can blame googletranslate! :P)

Please visit her site! It is chock full of beautiful pictures of her amazing and wonderful works.

Webpage
http://www.geocities.jp/la_cocina_alegre/
Gallery
http://www.geocities.jp/la_cocina_alegre/gallery.html
English Blog
http://la-cocina-alegre.blogspot.com/

Arigato gozaimashita Tomohachi, what an inspiration your work is!
--------------------------------------
私は最近、新しい友達がなさ:)私が初めて彼女のサイト全体の時'レシピ'の....完璧なパンのテクスチャを検索した来たこの後ライダーキバそれ以上に彼女のブログに悩んでいる私を開始した。

そのため、日本語の文字が私の最低限の知識とGoogleの翻訳の助けで、私はTomohachiのサイトに出くわした。

にちょっと面白がって彼女の英語ブログを読んで、彼女は、私は楽しむことができるユーモアの非常に穏やかなセンスを持って、非常に彼女の裁判とミ ニのエラーを共有して決定!彼女のブログ以来、仕掛品でいっぱいだった私はかなり長い間に占領(ワーク得たでの進捗状況)の写真まで、私はこの運命的なポ ストを直撃...

http://la-cocina-alegre.blogspot.com/2009/04/rusk.html

今、は、はまさに私が捜していた!ので、ここで我々は、細密ている人:

1)彼女の仕事のプロセスを共有する寛大である
2)彼女の美しい作品のかかる美しい写真
3)英語に堪能ではないもののがPOSTに英語で自分の(okに時間がかかった人は英語のみ)特典を読んでくれる!

と騒々しいと私は、私ではなくときには、新しいお友達と...時間のi最大限に活かしての最初の一歩になる内気な時を表示される可能性があります として快活にばかみたいに自分の考えでは、他の政党がないことを願って口走る私の要領の悪さは犯罪。ので、通信偉大されない可能性がある、電子メール、大 胆にも仕事大爆笑だがのためのレシピを求めてオフに起動するための賢明なgoogletranslateの助けを借りてメールを作成しちょっと!場合は、 質問しないで私のモットーは、"の場合、"知っていることがあります

と彼女は答えた!非常に積極的すぎる!などの詳細をどのように効果を達成するために!ので、ここでは、彼女の許可を得て、どのように、彼女は完璧なパンのテクスチャを実現しています^ ^

私は炭酸飲料の炭酸ナトリウムを使用します。
してください"直径グレイス"は約1.2センチメートルとの樹脂粘土のボールを準備する
2についてハーティの玉〜2.2センチメートルの直径です。心のこもったので、"よりも少しハーティを使用すると、空気が多く含まれてグレイス"。ソフト には、ミキシング2 earpicksソーダの炭酸塩と水の数滴の粘土のボールへの完全な情報を追加します。
ミックスを再度。ご希望の形や場所ベーキングシート上に粘土の形状。電子レンジ、オーブンに入れて、数秒のために加熱する。
加熱時間は、アイテムのサイズに応じて異なっている。私はいつも
約20〜40秒後に加熱する。してください。注意深く観察するときに加熱する。もしあなたが成功すると、粘土で泡を参照することができます。


私は少し再ている彼女の説明に言えば、あなたを気にしない、Tomohachi期待!

以来、私は電子レンジを持っていない、私はオーブントースターとはるかに高い温度の私はポリマー粘土のものを使うよりも設定推測にこの試みをしなければならない。彼女の先端を監視していたがやけどを聞かせていないすべてのです!

また、彼女は親切に私の心にいくつかのより多くのものを維持する思い出しています:

1)は、成功率は約です。 90%
2)粘土の焼成後は少し縮む

私は私は最初の一歩を踏み出したうれしいです:)ので、はるかにあなたの寛大さをありがとう、私と一緒に忍耐Tomohachi!とはまったく悪 いではなく、あなたの英語は、私は完全に理解して!私は謝罪を自分の下手な日本語も(いや、そのためにはあなたgoogletranslateを非難する ことができます!:P)は

してください彼女のサイトを参照してください!これはぎっしり彼女のすばらしい、素晴らしい作品の美しい写真がいっぱいです。

ウェブページ
http://www.geocities.jp/la_cocina_alegre/
ギャラリー
http://www.geocities.jp/la_cocina_alegre/gallery.html
英語ブログ
http://la-cocina-alegre.blogspot.com/

ありがとうgozaimashita Tomohachi、インスピレーションをあなたの仕事とは何か!