1:12 scale dollhouse miniature bear cookie packages - polymer clay, pastels, inkscape, paper, plastic, wire
Phew! It's been a really humid Sunday, the rain this morning didn't seem to get rid of the heat~~ *perspires* working with polymer clay has also warmed up my room!
I first came across real life versions of these TOTALLY ADORABLE bear cookies in my facebook stream!
Couldn't shake it out of my head, even though I was drowsy on cold medication :P Just had had HAD to make 'em!
Of course, this wouldn't be a Cindy-post if I didn't muck up. While trying to figure out how to make rabbit and cat versions of them, I got so excited that I baked these prototypes without applying pastels to the raw polymer clay before baking XD XD XD These are also adaptations to the original design, I have one more, but that's a secret for now (or rather, I'm really too sick to keep going... *koffkoffKOFF*)
But!!! I put that aside yesterday, and finished up the bear batch today. They are now up on my
Etsy store (you can visit the store via the Etsy widget on the right of my blog too!)
1:12 dollhouse scale miniature bowl and dishes - PVC sheet, decal
I have also neglected to blog about my progress on my Brew cafe.....prototyping had to be done for dishes....
1:12 dollhouse scale miniature paper cups - Inkscape, paper, glue
and more cups, this time for hot drinks, and maybe even more sodas?? Am in the middle of my 3rd failure at making those hot coffee cup covers, so of course, that was put aside until I have enough strength to fail again, and again.........
1:12 dollhouse scale miniature sandwiches - air dry clay, acrylic paint, glue
also worked on some sandwich packaging, am not happy with these but after failing for 2 days straight, I decided to work on something else (the cookies haha). And I was too generous with the sandwich fillings!!! They are bursting out of the packaging! Or I have to make bigger sandwich holders. Hrm. *head hurts trying to decide*
1:12 dollhouse scale miniature sandwiches - air dry clay, acrylic paint, glue
Since they are too fat for the packaging, these will also go into my cafe :) I had been hoping to film another video as part of my "Watch Me Work" series, of me assembling some of these sandwiches, but of course, this cold and sore throat I have has delayed plans for that. Hurrumph. Maybe next week.
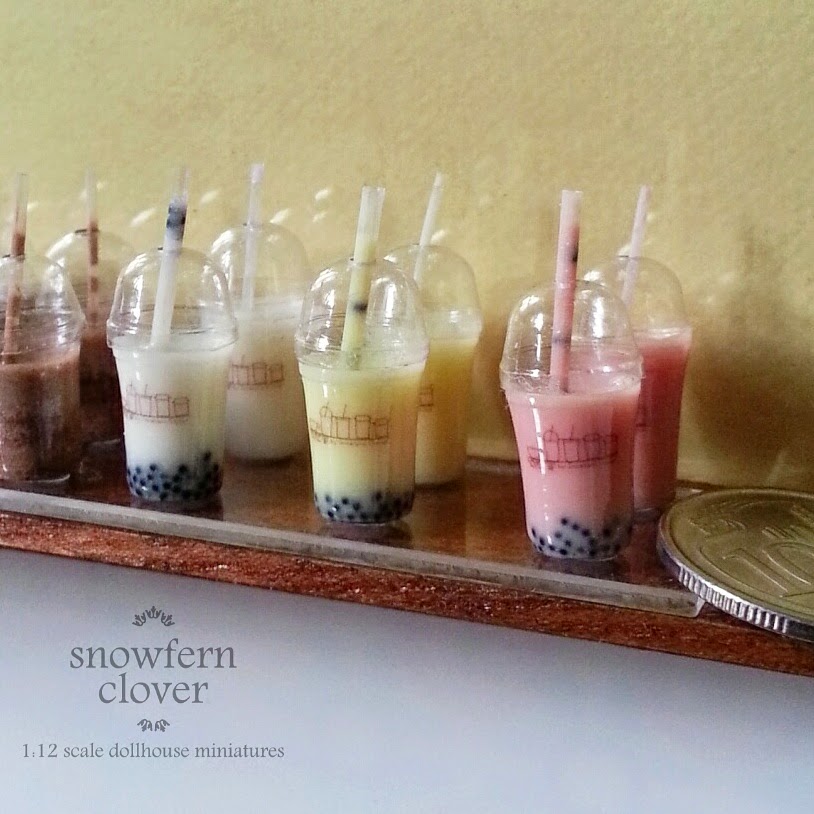
1:12 dollhouse scale miniature milkshakes - epoxy resin, acrylic paint, PVC sheet, decal, Inkscape
If you have been following my facebook or instagram, you probably have seen these milkshakes already! I have listed some of them on my Etsy too ^_^
1:12 dollhouse scale miniature iced sodas - epoxy resin, ink, PVC sheet, decal, Inkscape
When I first posted these up on facebook, the response was really encouraging, and some lovely customers bought up a few of these almost immediately! *grateful bow*
1:12 dollhouse scale miniature iced sodas - epoxy resin, ink, PVC sheet, decal, Inkscape
So I decided to open a pre-order (now closed, sorry!), and 2 more lovely ladies ordered the above 6 sodas ^_^
Don't worry, I still have some up in my Etsy store, and if there is still more demand, I will open another round of pre-orders once I have more cups made!
1:12 dollhouse scale miniature plastic cups - PVC sheet
Speaking of which, the stack on the left are the 'for sale' ones, and the stack on the right are rejects :( The failure rate for the cups is high, more because I use a heat gun and control of the temperature is not so even. But I will still use the 'failure' stack as props in my
Brew Cafe!
If you wish to know how I made these cups, please do refer to my
previous post/video where I have discussed the tools, material and technique I used!
1:12 dollhouse scale miniature Danish Butter Cookies - Tin (from greedbay), paper, polymer clay, pastels, sealant, decal, Inkscape, Fastum Gel, Anarex
A few weeks ago (or maybe even months!) I received 2 emails from 2 separate customers who requested the ever popular danish butter cookie sets. Although I enjoy making them, the sheer repetitiveness of crimping the papers and making 24 polymner clay cookies per tin simply wrecks my hand and shoulder. I have been slathering the injuries with Fastum Gel and taking anarex, and am much better now, but really, I can no longer take orders for these T-T But I have other ideas in mind, let's see when I am ready to experiment (read: fail without flipping the table) again!!!!!
PHEW! Sooooo many updates! I had no idea I was so productive :P Keeping busy is good. Throwing myself into work is the best way not to drive myself crazy, what with everything going on now.
(sometimes I feel stupid blogging anymore, it seems not that many people bother reading blogs, what with instant gratification sites like instagram and pinterest? I am guilty of moving on to Instagram, but when I feel like ruminating or am sick of talking to myself, it's always nice to return here.
Hello, are you still out there? Have you fallen asleep? *pokes and jabs*