
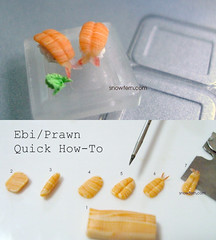
Ebi Quick How-To
Originally uploaded by Snowfern
1) layer the colours you wish to use, i used fimo translucent orange and for the whiter bits, 1:1 translucent white:white with a touch of translucent orange. stretch clay out to desired size (for 1:12 scale i have the length about 5mm or 3/16")
2) slice thinly, approx 1mm slices
3) roll into a log making sure the stripes run horizontal to the length of the prawn
4) gently smoosh it down onto the tile
5) scour approx 4 lines equally horizontally across with the razor blade taking care not to cut through the clay, then using your needle tool make a thicker dent vertically down the prawn
6) for the fiddly tail bits, i used translucent KATO clay as it tends to bake stronger, coloured it slightly by smearing a thin bit of red onto it, and cutting it into tiny rhombus shapes, bake according to product specifications. after it has been baked and cooled, using a touch of liquid fimo to act as a glue and strengthener, attach it to the end of the prawn body
7) carefully slide your blade under the prawn to lift it off the tile.
all that's left to do is to make your sushi rice (i use a small blob of 1:1 translucent white:white and textured it with my needle tool), place prawn gently on top, bake, then gloss if desired. the prawn sushi hasn't been glossed yet.
have fun! please do not re-distribute this tutorial without permission, all i ask is a link back to my blog. :)
Difficulty level: Intermediate
wonderful tutorial. Hoping to post it on the mini food blog...
ReplyDeletego for it Sumaiya! ^ ^
ReplyDeletei have a new post coming up soon, halloween related, i hope it's not too explicit for the mini food blog tee hee...
:X
Great tutorial! easy and the result looks good :)
ReplyDelete